SHAREit is an app developed by Lenovo which you can use to share data between your wireless devices. Now we will learn how to use SHAREit on pc . And also we will resolve issues such as SHAREit not working, connection timeout e.t.c . By this post you know how to connect to your PC using SHAREit by various methods.
Shareit on Your PC
Along with android and ios versions SHAREit is also available on PC . First you must update your pc version of SHAREit. As the new version of SHAREit for PC is advance, so we will learn various techniques to connect with it using mobile devices.
Ways to use SHAREit on PC
Watch out this simple video to use SHAREit.
Now if you want to know more or facing trouble connecting to your SHAREit then you can simply check the video below or follow these steps.
Follow these steps to troubleshoot your SHAREit connection
Turn ON your Wifi adapter
Troubleshoot Your Internal Settings
Connect Using your Router
Connect using Mannual Hotspot
Now let's talk about these steps in detail
SHAREit use wifi connection to transfer data between multimedia devices. So first step is to turn on the wireless adapter. And you all know how to do it.
As PC version of SHAREit will make a hotspot connection so we need to check whether microsoft virtual hotspot adapter is enabled or not. By default this is already enabled but if you are facing problem in connecting to your cellphone from pc using SHAREit then it probably be the reason beside this. So now we will troubleshoot this.
Right click on "MY PC". Then click on "PROPERTIES" and then "DEVICE MANAGER" Now under "Network Adapter" search for "Microsoft Hosted Network Virtual Adapter " and right click on that and Enable it. If there is no "enable" option that means it is already activated.
Now after that Just open SHAREit on you PC and start connecting to it. As soon as you will be prompted to connect, simply open your SHAREit on cellphone and connect to pc's network using wifi. The password for that network will be in your pc in shareit.
Now the second method is to connect to SHAREit using your router. In this you need to connect your PC and your cellphone device to your router's network. This is the simplest method at all. But here you will notice a difference in tramittion speed of data.
As in my video above I have used Netgear 150 mbps router; so I got only approx 2-3MB max speed of data transmittion and also sometime it was too slow. So If you have a high speed router then SHAREit may perform great. If you don't have one you can check latest new routers
Now the third and final method is to create hotspot of your own. This is the best method if SHAREit on PC is unable to create it's own hotspot.
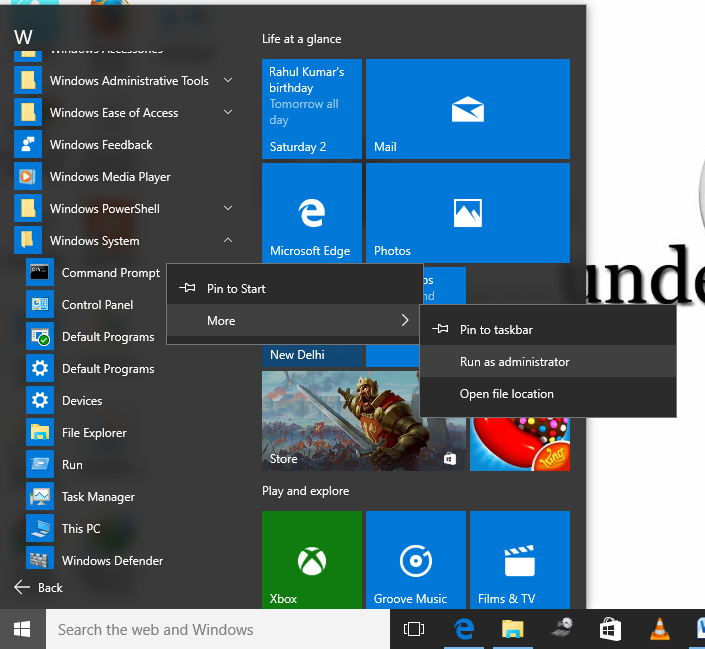
First Open SHAREit. After that now Open Command Prompt. Make sure you run it as an administrator
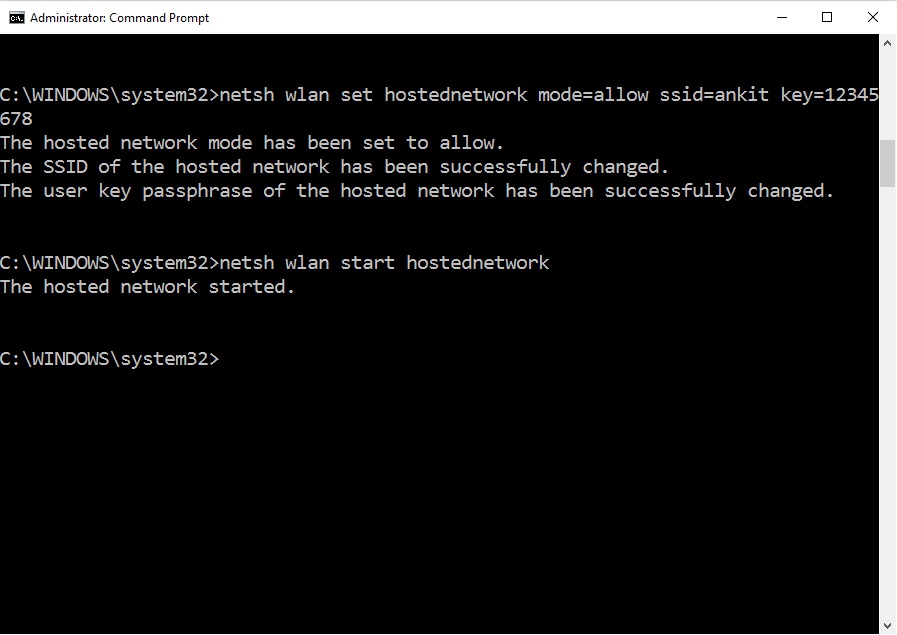
Now follow these commands to create a hotspot
netsh wlan set hostednetwork mode=allown ssid=home key=12345678
Now we need to activate hostednetwork on pc by following these commands
netsh wlan start hostednetwork
Now as you have activated hotspot on pc . Then open SHAREit on your cellphone and connect to the network you just created using the above steps. The key will be "12345678" as we already have assigned that.
In this method your SHAREit will ask that is it LAN or HOTSPOT; then choose "LAN" or simply do nothing as it will automatic connect to your network.
Final words about SHAREit on PC
SHAREit is a nice app. Now in latest versions we have multifunctionality. Using SHAREit we can now control our pc, use cellphone as remote control to control powerpoint slides. Also you can enjoy watching pictures from you cellphone to your computer screen using SHAREit With these above methods you can easily resolve SHAREit not working,SHAREit connection problems yourself. Now I hope you have learned How to use SHAREit on your Pc and will teach others too and also tell us in comments how you like this post.
SHAREit is an app which is used to share data wireless at high speed between two or more wireless devices. It is a common application amoung people. Now in this post you will learn to share SHAREit using SHAREit.
Know More About SHAREit
SHAREit is a free application by LENOVO. With SHAREit you can transfer your files, audio , video, apps and other things to your friend's IOs, Android device or windows device.
SHAREitcan also be installed on PC and then you can share wirelessely your movies from you pc to your cellphone.
SHAREit also allows remote connection to your pc. You can use it for remote viewing. With SHAREit you can view whole content of your pc in your cellphone.
With new version of SHAREit you can now control Power point presentation with your cellphone.
But to make your cellphone, a remote control for your pc you need to download SHAREit for PC
How to Share SHAREit to you other multimedia device
Now You need to follow these steps to share SHAREit to your friends
First open SHAREit on your device
Now search for "invite" option in your app.
Now choose your mode to send SHAREit.
You have two options
Via Bluetooth
Using Hotspot
If you selectBluetooth then, ask your friend to turn on his bluetooth. And you will be able to succesfully send SHAREit to your friend's device.
If you select Hotspot then , your cellphone will open a hotspot and the network name will be there. Now tell your friend to open his wifi and then ask him to connect to that network which was created earlied by your cellphone. After that he need to put a given ip address on his browser to download SHAREit. After that he can simply install SHAREit in his system.
Now you have succefully learned to Share SHAREit using SHAREit itself then share it with your friends and If you have any other Problem related to SHAREit then do comment here. We be will happy to resolve the issue.
Started with Xiaomi Mi3 and now with a lot of options Xiaomi had directly landed to the heart of Indian people.
Now Xiaomi is here with it's Xiaomi Redmi Note Prime. It was launched last year in December 2015 and grabbed the market.
Specifications Of Redmi Note Prime
Talking about the specifications, Redmi Note Prime comes with a Quad-core 1.2 Ghz Cortex A 53 with a combination of 2 Gigs of RAM along with 16 GB of internal storage with expandable card slot, which supports micro SD upto 32 GB. For gaming it is packed with Adrino 306 GPU. And for photography it has 13 MP of primary shooter and 5 MP secondary for taking nice selfies.
The Xiaomi Redmi Note Prime is a dula Sim device which support 4G too. The both SIM are micro and connectivity includes WIFI,Bluetooth 4.0,GPS with Glonass, FM radio, and with micro USB 2.0
Xiaomi Redmi Note Prime had a huge 5.5 inch HD screen having pixel density around 267ppi and it supports Multi touch too. It consists of 3100 MAh battery and it include accelerometer, gyro, proximity sensors. It also have a compass too.
Detailed Specifications
Connectivity
GSM / HSPA / LTE
SIM Dual SIM (Micro-SIM, dual stand-by)
Bluetooth v4.0, A2DP, LE
GPS: Yes, with A-GPS, GLONASS, BDS
Radio: Stereo FM radio
USB microUSB v2.0, USB Host
WLAN Wi-Fi 802.11 a/b/g/n, Wi-Fi Direct, hotspot
Released 2015, December
BODY
Dimensions : 154 x 78.7 x 9.4 mm (6.06 x 3.10 x 0.37 in)
Weight :185 g (6.53 oz)
DISPLAY Type : IPS LCD capacitive touchscreen, 16M colors
Size 5.5 inches (~68.8% screen-to-body ratio)
Resolution 720 x 1280 pixels (~267 ppi pixel density)
Multitouch Yes
- MIUI 7
PLATFORM
OS Android OS, v4.4.4 (KitKat)
Chipset Qualcomm MSM8916 Snapdragon 410
CPU Quad-core 1.2 GHz Cortex-A53
GPU Adreno 306
MEMORY
Card slot microSD, up to 32 GB
Internal 16 GB, 2 GB RAM
CAMERA
Primary 13 MP, f/2.2, 28mm, autofocus, LED flash
Features Geo-tagging, touch focus, face/smile detection, HDR
Video 1080p@30fps
Secondary 5 MP, 720p
SOUND
Alert types Vibration; MP3, WAV ringtones
Loudspeaker Yes
3.5mm jack Yes
COMMS
FEATURES
Sensors Accelerometer, gyro, proximity, compass
Messaging SMS(threaded view),MMS, Email, Push Mail, IM
Browser HTML5
Java No
Fast battery charging: 30% in 30 min (Quick Charge 1.0)
Active noise cancellation with dedicated mic
- MP4/H.264
player
- MP3/WAV/eAAC+/FLAC player
Photo/video editor
Document viewer
BATTERY Removable Li-Po 3100 mAh battery
Stand-by Up to 775 h (3G) Talk time Up to 38 h (3G)
Music play Up to 60 h
With all these features and with an excieting price range of 8499 INR you must grab Xiomi Redmi Note Prime and bring it to your home exclusively form amazon.in
When setting up a wireless network, it is must that you correctly configure your router. By configuring your router correctly, you can prevent any unauthorized access to your wireless network.
Now in this post you will learn to setup your router.
Configure Your Router
There are a lot of manufacturers who provide wireless routers. Amoung them TP-Link dual antenna router is the best option for small purposes. As I also have a TP-Link Router So here I will provide the steps for configuring that network device. You need not be worried as almost the basic steps for configuring router of any company or brand are almost similar.
Steps To Configure Wireless Router
First of all power on your router. As soon as your router on, check that wireless indicator is blinking or not. If not then push the wireless on-off button on the back side of your router. You may have to push that button for 5-10 seconds to turn on the wireless transmission.
Now After turning on the wireless transmission, connect to your router's network by simply turning on your laptop's wireless network.
As for the first time, your router's wireless network will ask for wireless password. So for that you have to check your wifi router manual or wireless device boxing to find the password. In my case I found that password on a detailed sticker beneath my router.
Now after you have connected to the wireless network of your router, you have to find the default gateway i.e. from where you can access to your router's settings.
Changing Default UserName and Password Of your Wireless Router
For that Go to Run and then type cmd to open command prompt.
Now Type ipconfig in the command prompt window and check the ip address of your router i.e. default gateway. Copy that address to your browser's address bar and click enter.
Now you will have the welcome page of your Wireless Router
Now put the username and password there. By default the username and password is "admin"
Now in the configuration settings of your router search for System Tools and then password. There put new username and password in the asked place.
As soon as you click on save, the router configuration page will automatically refresh and will ask for username and password. Now put the new username and password that you have saved earlier.
Steps For Changing Wireless Network Key
Now the most important part is to change the wireless network key of your router so as to prevent unauthorized access to your wireless network.For that follow these simple steps.
Login to your router's admin panel. After that search for Wireless Security and there you will be prompted for the new wireless password.
Make sure that the wireless password must be of 8 characters.
Finally It's Done
These were the basic steps which you must know while configuring your wireless router. With good settings your network is secured and there will be no theft of your transmitted data. Further while playing games you can make your router's network private and limit the number of gamers.
As nowadays compact disk drive has become an optional in our laptops so we must be prepared ourselves by learning to create a bootable USB drive. So that in the case of your system failure you can easily boot your PC with a Pendrive.
Steps To Create A Bootable Pen Drive
There are a lot of ways to create a bootable removable disk, but I will share you the easiest way that I use always. The simplest way is to use a software named Rufus by which you can create a bootable usb drive. To use this software you must have an image of your operating system saved in your hard disk. And Now follow these steps
After downloading and connecting your Pen Drive, run rufus by clicking in it's exe file. Now you will see it's User Interface
Now after this click on graphic icon displayed in the picture to select the iso i.e. image file of your desired operating system.
From there you can browse for the windows image file and click on Open
After that Click on Start. Make sure that your Pen Drive is empty as after clicking start it will format your USB drive and make it bootable. And after that, your removable drive has become bootable.
Now to boot a PC using your newly created Bootable USB Drive you must first check the BIOS setting of that PC.
For that enter the BIOS setup using F2 or Del or Assist key in Vaio laptops. After that go to the "Boot" tab or search for boot options in your BIOS settings.
Now Enable these three settings
"Boot To Removable Devices", "USB Boot", "Boot USB Device First"
Just Save these Settings and Now you are ready to Boot using your Pendrive. In this way you can create your Removable Bootable Drive. You must have a backup of your operating system or image file so that when requirement needed, you can easily be able to boot your PC using your pendrive.
Now a days android phones have become popular and with it's app support it have unlimited app. Among those app you must have these five android apps installed in your cellphone.
1. Beauty Plus
Beauty Plus is a cool app developed for people who loves to updates their Facebook profile pics daily. This is a beautiful app which have a lot of cool features to edit your picture. It have an auto retouch function which will make your pic cool.You also get a lot of manual filters in it. It has a crop and rotate facility. Another cool feature is that this app can make you look taller, slimmer, it can also remove your dark circle too. So this app is for girls and boys. Now make your profile pic awesome by Beauty Plus.
2. Hinkhoj Dictionary
Hinkhoj Dictionary is the best dictionary to find the meanings of English words. It has an unlimited database of words and their meanings. This dictionary always provides a new word daily. It has various tools such as Pronunciation (English), Spell checker, a word guess game and a cross word. This dictionary also have an option to save words which you looks for and it also have a record of your search history. Now try out this cool Hinkhoj Dictionary.
3. Musixmatch
With this app there is no need to search lyrics on internet. This app is for song lovers and singers who loves to sing English songs. This app plays songswith their lyrics. It also have a singing option where it mutes all the vocals and you can sing with the song. But this app requires an active internet connection to download the lyrics one time and it saves it for offline use. You can download Musixmatch.
4. Shazam
If you started liking a music which you are currently listening and you don't know the name of that song then this app is best suited for you. This apprecognize tone, song and even vocals. You can sing and it will find that song for you. And even it will display the lyrics too. You can listen live and most important copy the name and search and download it from internet. You can download Shazam form the Play Store.
5. SHAREit
If you likes to share a lot of data between your friends then SHAREit must be there with you always. This app works with wifi/hotspot which supports high speed data transfer upto 30 MBPS average. It depends on cellphone i.e. sender and receiver. This app can send audio, video and apps too. You can also download it for PC and enjoy data transfer without any penderive. You can download SHAREit on your android and PC.
So you must download these five android app and make your cellphone more cool. Also if you have any cool suggestions regarding any apps you can comment here.
How To Show Hidden Files affected by Shortcut Virus
If your computer is affected by Shortcut virus and You wants to view hidden files affected by shortcut virus then following is the simplest way to get them from your Pendrive and other removable media.
Check out This video on How to show Hidden files affected By shortcut Virus
Go to Control Panel and open Folder Option
Now click on View and CheckShow Hidden Files, Folders, and drives
Third and Most important Step is To UNCHECKHide protected operating system files(Recommended)
This is the simplest way to show hidden files affected by shortcut virus.
How To recover Hidden files using Command Prompt
First connect your removable media to your PC and After that open Command Prompt and Type the following command on to that window.
attrib -h -r -s g:\*.*/s/d
attrib -h -r -s g:\*.*/s/d along with the spaces. Here letter G represent your removable drive letter.
Now your files will be visible and copy them but leave shortcuts and after that Format the pendrive.
Get an antivirus programe to secure your PC and Update it regularly.
In this way you easily recover and show hidden files affected by shortcut virus.
For More Tips and Tricks on Computer check out our New Website The Guys' Computer
In our webpage when we want to insert quotes on a sentence we use <q> tag.
Quoting a whole Paragraph
To make a paragraph quoted or different we use Blockquote.
<blockquote> Your paragraph here </blockquote>
For Example
Hello readers I am back after 2 weeks. As Technosians admin was unwell for
2 weeks that's why there was no update since last 2 weeks. This absence had
made technosians indexing low or may be Google had forgot Technosians from
it's database. So to get back on it's indexing list we have to post here again
daily and now Technosians will be regular updated though it is expected.
The above paragraph is the example of Blockquote.
Scrolling Text in Your Webpage
Sometimes you want to scroll the text on your webpage. To facilitate this there is <marquee> tag in HTML
<marquee> your text here </marquee>
Now if you want to scroll the text in a particular direction then we use direction attribute
To scroll text towards right direction then we will use
<marquee direction="right"> Hello There </marquee>
You can use UP or Down or Left as desired.
Creation Of Table in your Webpage
Sometime we needs to create a table in our Webpage.
To create a table HTML has <table> tag for the creation of table
Till Now we have learned some of the simple tags of HTML. Now it's time for creating hyper texts i.e. hyperlink in our HTML document.
What is HYPERLINK
Hyperlink is a reference to data that reader can directly follow by clicking or by hovering. In simple words it refers to another webpage having some information.
HyperText
Hypertext is text which contains link to other texts. "Technosians" Above we have the example of hyper text and by clicking on it you will redirected to the Technosians home page.
How To Create Hypertext
To create a hypertext you have to use <a> tag <a> tag alone cannot be used. We have to use href attribute. <a href="website url here"> Website Name</a> Try this example create an HTML document
Now I have got A Hypertext in my webpage and when I will hover mouse over that text mouse will convert into a hand and my website name will be clickable.
How To make your Hyperlink open in Next tab
After creating a hypertext you will not want to move your audience from your main webpage. For this you have to create hypertext having capability of opening hyperlink to a next tab. To do this you just have to add "target" attribute to your <a> tag <a href="website URL" target="next"> Website Name</a> Now try this in your html document.
Adding Images To Your Webpage
Till Now We have boaring webpages having only text. Now to make your webpage alive you have to add some images. For Adding images we use <img> tag Now <img> tag needs information i.e. from where it will display image. To accompany this we use "src" attribute <img src="url or location where image lies."> And One important thing is that <img> tag doesn't have a closing tag. Add the below information to your html document. <img src="https://www.google.co.in/images/srpr/logo11w.png"> This will add Google Image on your webpage.
Addding Alt Attribute to Img tag
You have a high speed internet connection. But your website visitors may not have. So in that case they must know about the image which is not displayed to them. To add more information we use alt attribute with our img tag. <img src="https://www.google.co.in/images/srpr/logo11w.png" alt="Google"> Now update your webpage right now.
Making your Image As a Hyperlink
Hyperlinking is an easy task in HTML. You can make your image clickable. To make your image as a hyperlink use img tag inside <a> tag <a href="www.google.com" target="next"><img src="https://www.google.co.in/images/srpr/logo11w.png" alt="Google"> Now try this code now in your html document. I hope you had learned how to use img element and hyperlink creation. If you have more information reagarding to this topic then please comment here
We are already Introduced to HTML So Now We want out own official Webpage in Webworld. We are creating our first webpage i.e. "About Techno Geek" So let's start creating our Webpage Now The html is mainly focused in building Structure. For decorating We have CSS. We will learn it after HTML.
First Recall The basic format Again
<html> <head> <title> Techno Geek </title> </head> <body> The Body Area consists of The content which has to be displayed on The Webpage </body> </html>
Let have a Look At our Webpage
Ok can you guess the ingredients of above webpage?
So we have A heading , A paragraph , A Subheading and a list.
It's interview time now
Welcome Heroes. You made our webpage complete. <h1> <p> <h2> and <li> : Thanks for inviting and yes we do !
So what are you called inside The HTML <h1> : We all are called tags. Oh as like <title> and other who we have met at introduction. <h1>: Yes
I am eager about your work and location inside HTML. <h1>: Ok. I am the Heading Tag and I makes the Text as Heading. And I lies Inside the Body Tag and also I have closing tag too </h1> <p>: Hi I am ParagraphTag and I am used to make a paragraph inside the HTML. and I also have a closing tag </p>. <h2> : Hi ! I am a Subheading Tag and I used to create a subheadings and I am used mostly at webpage. <li> : Hi ! M... just wait a minute <li>. I have a question for <h2>. <h2> are you related to <h1> <h2> : Yes I am I am his brother and we are 6 brothers and our smallest brother is <h6>. We have our own work but generally our small brother is too small that he is not used generally. Ok Now it's your turn <li> . Please explain about yourself
<li>: My full name is List Item and I am called when there is need of List in HTML. I also have two Partners. OMG!! Who are those. I have not seen them at our HTML. <li>: Yea they were not there at your file. But let me introduce them. <li>: Here they are <ul> and <ol> Hello guys ! I am amazed that we have more guest too. Please tell us about yourselves. <ul>: I am used when unordered list is required like there is in your new website. But You were not there at my website. <li> : Default unordered list is applied. <ol> : And ordered list i.e. me places your list items in order. Default there is numerical counting.
<ol> <ul>: We are used befor the <li> and list items are displayed according to us. <h1>: Ok we have to go. We are needed in HTML. Thanks for this interview tags and I also have to publish this interview in Techno Geek's blog.
So the interview was amazing but there was something missed.
The <ul> and <ol> tags did not mentioned their place correctly so they emailed me their location
Hey techno Geek we are placed in this way <ul> <li> your text here</li> </ul>
and for ordered list
<ol> <li> your text here</li> </ol>
or you can add attribute like
<ol type="A"> <li> your content here</li> </ol>
Now you may be thinking Attribute what is that ?
So for the customization of tags we use attribute. Like above the attribute is type="A" Now We have our Techno Geek's About page ready. And it's your Experiment time Now To create your webpage. And in case you had forgot Then check Introduction To HTML. And If you are having any suggestions Then please do not forget to mention in comments.
If not then you are landed at the correct webpage.
Now within a couple of minutes you will know how websites are built.
What is a Website
As the name suggest "Web" that is a web not the spider's web but a group or various networks connected together.
And "Site" In real word it refers to place and in web-world it also refers to virtual area having webpages.
A webpage is just a page that provides information with the help of images text or animations.
And the best example you knows it already. Like Google and Facebook Which you use to surf with your browser.
Now you already know that a browser is an application software which is use to surf the websites.
Now let's move on the cool thing.
How a Webpage is Built
A webpage is basically built using HTML. There are other scripting languages too which are used to make a webpage interactive but as starting with basic here I will focus on HTML.
So What's HTML stand's for?
HTML stands for Hyper Text Markup Language
Basically It's name says that HTML is a language which focus on Structure having Links to another webpages.
In detail The HTML Says As your name has some meaning My name also Hyper Text- It stands for the Text which is clicable and can take you to another webpage.
Markup - I am all about the structure. HTML use me to create Structure.
So what's The structure Now?
As Like our body has a structure. We have head and body.
Like that a webpage also have
so basically there are 2 parts of HTML Head and Body.
As Head is an essential part of our body and we have a brain in It which knows everything about our body like that HTML
Head is a part of webpage which knows all about the webpage like it's title , and other information regarding to the webpage decoration and other effects.
And Body is the part where Information is feed which is to be displayed by the browser.
And all the part head and body are inside the HTML .
So let's create your first webpage.
To create an HTML page first you need a computer; You already have! then a notepad or a text editor. Then you are ready to create an HTML webpage
So here's your first Webpage
type the following code to your text editor
<html> <head> <title> MY First Webpage </title> </head>
<body> Hello Word I am having My first Webpage here. It's so easy and interesting. </body> </html>
and then save it as "My first webpage.HTML"
Now are you thinking What is This above thing and what it mean.
The Whole HTML works on tags <html> these things inside the angle brackets <> are tags each tag mean a specific thing to browser.
That means The file that you saved as My First Webpage.html is understood by the browser. The browser reads the instruction inside and interprets them and display it according to them.
As above I had told you that there is a head and body inside the HTML so we began with <html> tag After that Head comes <head> and you know every information is inside the head as told earlier so The title of the webpage will lie inside the head with <title> tag.
What is than </title> there. Every tag that is opened needs to be closed in HTML followed by slash / so that browser can understand that it's the end and will display the thing which will be there between opening and closing tag.
Similarly head is closed</head> And after that body is started With <body> tag and inside it We typed the message which will be displayed by the browser. and at last we close the </body> and then </html>
So As I told that the whole HTML is the world of tags and each tag provides a specific meaning to the browser.
So tomorrow Some more Important Tags will roll In.
Till then Experiment With these simple codes. This was the only introduction.
The real thing will come up In the next post.
If you have any suggestions regarding to simply more about HTML then please comment here. I will be very happy to update it for my readers.
After 3 or 4 days of depression. I am back here and today I am again with you.
I think This blog is going to starve as the writer is discontinuous here due to out of ideas and sources. As this is a blog so verified information is required as people reads and gain. For me this blog is just a test ground and will be passively alive. I thought that i must again start with a new angle a new website having all my design my code and with a custom domain. So for that I must have some knowledge of scripting. From now on I will have some Hyper Text here posted here. Currently I am learning from a Book and I have an idea of posting all the stuff which i learn in my own way. May be if there are some of guys who reads this blog daily or may be weekly as it is not updated daily so form now on We all will have HTML5 lessons here with me. It might be possible people already had knowledge of HTML but still there are always starter alive. Everyone want to learn as it helps in growing. As I am learning HTML/CSS so the next there will be a whole series of HTML/CSS. And as a test ground I will also create a dummy website at blogger to understand how the blogger will work with my website .
How it will link with my design and many more.
A lot of things to learn.
As I know the world wants something new. There are many old things that people already know. So may be that's why I am getting minimum traffic. But that's all right. As I lack resources like fast internet. Fast Internet is essential thing for a blogger as blogger has to read other bloggers blogs to learn more
Also I am connected with some of bloggers Like Rohan bro active at Learning With TeamSR, Sashidhar bro founder of Amfas Tech and Rahul bro having Spellbound Words. Those are amazing guys and they have amazing website and amazing work. As they are passionate about their work. But I want my self as a code lover who loves coding. I want to become an awesome programmer. Currently I am not a programmer but I think If I follow this inner feeling then soon one day I will become some serious programmer. Who stick to his computer whole night and always come up with new and awesome cool things. I love money But the thing I know is that I can't chase money as it is tough. And I had failed many time doing that. The thing I understood is that there is something that "Money" chases. That thing is "Passion". People having a passion for something are always rich as their work is their passion which they love doing day and night and money always Rolls in. So my search for passion is continued and I hope I can and I will have that work . Till then We all have HTML 5.
I hope I will get here some suggestion form the readers.